Category Archives: Software Engineering

Videos for unit testing / TDD in .net

I recently ran a lunch and learn about unit testing and test driven development. Could not find any amazing videos out there, so we went with these. Any better suggestions please let me know in the comments!

This one is more theory up to about 1 hour, then it gets hands on but with Java.: https://vimeo.com/user28557683/review/153480907/f38b042f2a

Hands on with .net and some great advice for writing good tests, but pretty low resolution: https://www.youtube.com/watch?v=dJUVNFxrK_4

If you have PluralSight, here are some good courses:

Keeping it simple – sometimes you don’t need to call .Any()

Something I’ve seen quite a lot of in the codebase I’m working on…

If a collection is empty, the count is 0 and the enumerator is valid but won’t return any items – so there is no need to call .Any() before summing or enumerating.

Count() example

articleTagListForTagGroup
    .Where(tag => tag.ChildTags.Any())
    .Sum(tag => tag.ChildTags.Count());

Because .Count() returns 0 if there aren’t any, this can be reduced to:

articleTagListForTagGroup
     .Sum(tag => tag.ChildTags.Count());

Enumerator / foreach example

if (tag.ChildTags.Any()) {
    foreach (var childTag in tag.ChildTags) {
        // Display

If there aren’t any ChildTags then the foreach has nothing to iterate over – but it won’t throw an error, it just jumps over the code block. It can be simplified to:

foreach (var childTag in tag.ChildTags) {
    // Display

Git tutorial for very basic usage

This quick how-to is designed for someone who needs to work on your code, but where it is not practical to train them on all the benefits of git/source control. I have some workflow thoughts for the git administrator at the end of the article. The tutorial is aimed at a Windows user but should be reasonably portable. Any thoughts, comments, criticisms, or ideas for improvements please let me know and I’ll edit the article!

Download and install software

Download the git client.

Run the installer and answer the questions as follows:

  • Install location: wherever you like!
  • Components to install: if you don’t want to use git much then feel free to remove the Windows Explorer integration, don’t bother with desktop and quick launch icons, etc. I would suggest you allow .git* to be associated with your default editor though.
  • Adjusting your PATH environment: select “Use git from git bash only”.
  • Configuring the line end conversions: Checkout Windows-style, commit Unix-style.

Get a copy of the project

GitHub and BitBucket clone URL locations

GitHub and BitBucket clone URL locations

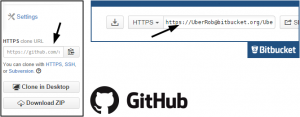
For this step, the git administrator should give you a URL for the git repository and a branch name, use these values in the commands below. If you’ve been given access to a BitBucket or github repository, the URL for the repository can be found on the site and depends on your username.

  • Open up Git GUI.
  • Clone Existing Repository… Source location is the git repository URL you’ve been given and the target directory is wherever you’d like it to be on your computer. If you’re given a choice, select to download a Full Copy as well.
  • Hit the Clone button and wait (you may need to enter your password)
  • Git GUI open repository

    Git GUI open repository

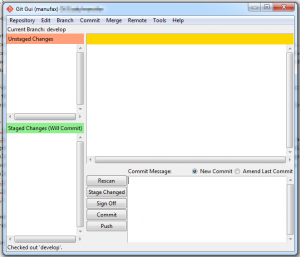
    When the download has finished, the Git GUI will automatically open the repository for you in a window that looks like this.
  • Git GUI create tracking branch

    Git GUI create tracking branch

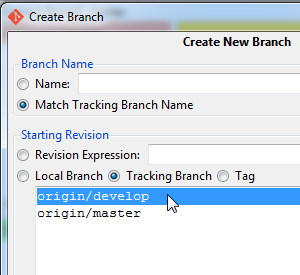
    Next you need to “checkout the correct branch”. In this case, we’re going to checkout the develop branch but you may have different instructions. Go to “Branch”, “Create”, “Match Tracking Branch Name” and click on origin/develop (or origin/branch-name) and then click create.

You are now ready to work!

You have work ready to send?

Git GUI Commit & Push

Git GUI Commit & Push

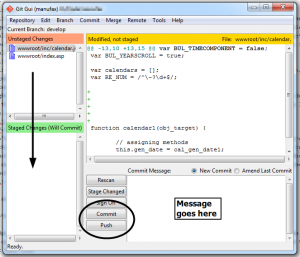
Open up Git GUI and it will list the repositories you have created – click on the correct one or use the open command to bring up the GUI window we’ve seen before. The changed files will be in the top left hand section. (Hint: if you’ve not closed the window from before, click the rescan button to show changed files).

Move these changes into the bottom left pane by selecting the files, the going to Commit -> Stage to Commit. Enter a message in the bottom right box and then click Commit. Then click Push.

You have sent your changes back to the repository owner (although it’s good form to let them know as well).

You have updated files to receive?

In this model, only either your or the repository owner can make changes at once (git is much more powerful than this, but we’re keeping it simple). If you know changes are coming from the source, wait until they’re ready then follow this update procedure.

Open up Git GUI to the repository and select Remote – Fetch From – origin. This gets the latest code data from the source.

Git local merge window

Git local merge window

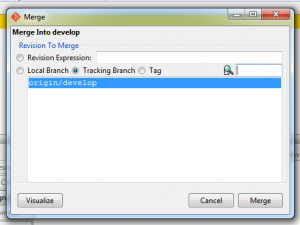
To update your code you need to go to Merge – Local Merge – you should be able to select origin/<your-branch-name> and then click merge. If you’ve not made any changes – or your changes are in completely different files, then it will merge fine and you’re ready to go again.

Workflow thoughts for the git administrator

To avoid exposing any of the more complicated workings of git, I’ve set the user up with a branch that only they are using. If you need to send them new files, they need to commit, push and then stop editing their files until you have merged new changes back into their branch for them. At that point, ask them to update.

YouTube oembed parameters / documentation

Update Nov 2017 there now appears to be official documentation.

While looking at a bug in Umbraco, I could not find, anywhere, a definitive description of the YouTube oembed service – so I’ve decided to write one up. Please let me know if you find other features, or if this has drifted away from accuracy. Or if I’ve just been incompetent and not found the official API documentation somehow.

The YouTube oembed service is available at https://www.youtube.com/oembed (note https, not http as otherwise advertised, it’s 301 redirected).

Standard parameters (as per oembed specification)

  • url – the URL of the resource
  • maxwidth – the maximum width. The thumbnail size is not affected. This value, if bigger than the usual video return, will increase the size of the video.
  • maxheight – the maximum height. The thumbnail size is not affected. This value will only decrease the size of the video.
  • format – “json” or “xml”

Non-standard parameters

  • scheme – you can set this to “https” to make the returned code work on a site served over https. (Why the returned data doesn’t use “//youtube.com”, I don’t know…)

Sources

Removing SSL 2.0, Adding TLS 1.1 and TLS 1.2 in on Windows 2008 (IIS 7.5)

By default, Windows 2008 R2 has some shonky SSL settings – it enables SSL 2.0, which is broken, and it doesn’t enable the best protocols – TLS 1.1 and 1.2. To disable and enable things as we want them, we need to go digging around in the registry.

I’ve compiled these instructions from this article details how to disable SSL 2.0 and this article with broken instructions on how to enable TLS 1.1 and TLS 1.2. As this process requires a server restart I thought this single article might keep downtime low.

IIS SSL capabilities are controlled at the system level, so this should work for other IIS versions as well.

Editing the registry

The keys we need to alter are in: HKey_Local_Machine\System\CurrentControlSet\Control\SecurityProviders\SCHANNEL\Protocols

There should already by a key (folder) called SSL 2.0, you need to create two new folders called TLS 1.1 and TLS 1.2.

Underneath these protocol keys, you need another set of keys (folders) called Client and Server. These may already exist for SSL 2.0.

Underneath the Server keys, we need to put a DWORD called Enabled and set it to 0 for SSL 2.0 and to 0xffffffff (Use the hexadecimal radio button) for the two TLS items.

Underneath the Client keys, we need to put a DWORD called DisabledByDefault and set it to 0 for TLS and ffffffff for SSL 2.0.

Reset the server and then check the protocols it now allows – everything should be sorted as more secure – check it using this tool.

Tool that sorts it out for you

If you’re happy installing random tools on your server, then you can get IIS Crypto to make the changes for you.

If I’ve got anything wrong, or you think I could be clearer, please drop me a comment below here! Thanks.

Clearing DNS caches

When making DNS changes it can often take a while for various DNS caches between yourself and the source to clear. I’ve often found that the last ones to change are the ones in the last few metres – from your router to your browser.

You’ll need to find the one upstream that’s incorrect and fix “backwards” from that – i.e. check your Windows DNS cache first, then work towards the browser.

Browser

According to OpenDNS, all browsers will clear their DNS cache if you use their clear cache functionality, but that’ll take out a lot more than DNS.

Chrome: Visit chrome://net-internals/#dns and press the ‘clear hosts cache’ button. You can also see what IP it’s talking to on this page.

Firefox: Close and re-open browser should do it – otherwise there’s a fiddly method involving about:config. When I’ve tried out the plug-ins I’ll add a suggestion, but if you’ve using one let me know in the comments and I’ll update this.

IE: no independent DNS cache.

Local Windows machine

At command prompt: ipconfig /flushdns

Use ping to see if you’re resolving OK.

Windows Server (if acting as DNS cache)

At command prompt: dnscommand <servername> /clearcache

Checklist for large file upload issues in IIS7 / .net

I had an issue with large(-ish) file uploads yesterday and thought I should write up the things I needed to change, as it’s one of those things that I have to do from time to time and I invariably forget all of the settings.

This is in .net Integrated Pipeline mode – it’s different for Classic ASP.

The following two settings allow files of up to 200MB (value is in kilobytes) taking up to 10 minutes (value is in seconds). See documentation for this

<system.web>
  <httpRuntime executionTimeout="600" maxRequestLength="204800" />
</system.web>

You will also need to alter this setting (value is in bytes this time – see the documentation). It defaults to about 30Mb.

<system.webServer>
   <security>
    <requestFiltering>
      <requestLimits maxAllowedContentLength="209715200" />
    </requestFiltering>
  </security>
</system.webServer>

My understanding is that these settings are usually kept quite low to avoid DoS attacks, and if you’re admin for a large site you should consider moving your uploads to a different server or at least a different application / application pool.

If there’s anything missing from these settings, or some nuance I’m missing, please let me know in the comments.

8 steps to putting your café on the internet

I see two reasons for a local business, such as a cafĂ©, to have an internet presence – discovery and engagement.

Discovery is easier and is the “classic” reason – it’s to help new customers discover your existence and while traditionally that might mean a website, these days it’s going to be more about appearance on map sites like Google Maps. Engagement is to build a relationship with customers outside of the cafĂ© so that they will frequent you more regularly / mention you to other new customers.

0. (Buy a domain name and sort out an e-mail account on that domain)

I’m not of the opinion that you need a website for a local service like a cafĂ© as a website isn’t going to be best at engagement or for discovery. But if you’re going to get one, then get one first because nearly every other service you will sign up for will give you the opportunity to enter an address and an e-mail and you’ll save loads of time if you’ve got these sorted already. Just add the simplest page with contact details (including address) and opening times and worry about anything flashier later.

1. Get yourself listed on map services

So that people using them on mobile will be able to see you, and be directed to you if they search for “coffee”. Start with Google Maps, then Apple Maps (you’ll need an iPhone), then Bing Maps. This is approximately in ascending order of difficulty as well – Google is dead easy, Bing is cryptic.

2. Consider TripAdvisor listing

The TripAdvisor app has a great functionality for restaurants “near me now”. If food is a strong point of yours, consider getting listed.

3. Get yourself on any vertical/specialist directories.

For example, if you offer free Wi-Fi then look for websites that list Wi-Fi locations and get yourself listed. (A word of warning, it shouldn’t cost more than a few quid to get on these).

Are you suitable for services like Just Eat?

4. Decide how you’re going to engage with customers outside the cafĂ©

This is quite critical, because it’s not worth doing anything about engagement if you don’t think you’ve got anything to say and you’re not going to bother saying it. It can be a simple notification about the “sandwich of the day”, or you could do internet-only offers (free upgrade to large if you say today’s password), or first person to answer a trivia question in-store gets a free drink. Be creative!

5. Get Twitter and Facebook accounts

You can keep your work down by linking these accounts – and I prefer setting Twitter to post to Facebook because you can use services like Twuffer to set up Tweets to come out at certain times. If you’re going to post more than 3 times a day, it might be worth keeping them separate though as Twitter users expect more traffic than Facebook.

6. Publicise Twitter & Facebook on site

If you’ve got these accounts, the people you need to start following you are those who have been in at least once – not friends and family scattered across the country! Entice customers by hinting at what you may be posting (offers? events? local news? jokes?)

7. Respond to incoming messages through Twitter / Facebook

Finally, if you do get a following, remember to politely respond to anything they say to you.

8. Build a website – keep an eye on mobile functionality

Finally, build a website! Make sure that it’s going to look good on a mobile screen as users coming from the mapping services are likely to be mobile users. Ensure opening times, location and contact number are prominently displayed. If you’re putting a menu up, remember to keep it up to date or label it “sample menu”. If you’re using Twitter you could put your latest tweets up – although it will look worse if you’ve got a Twitter feed and the latest tweet was months ago…
Storing arbitrary key/value pairs (like hashtable or dictionary) in Azure table storage

Azure table storage allows you to store different data structures in the same table, but the standard routines for getting data in and out require you to know that structure at compile time – as you have to define the entity (class) to be persisted.

There are some very clever implementations that use the dynamic object features of C# to create objects with run-time defined properties. But what if you just want to store “some additional data” in key/value pairs but you don’t really need them to be properties on an object? There’s nothing out of the box for that, but you can override that by altering the Read/WriteEntity methods on TableEntity.

Here’s a naive implementation (it assumes string data, doesn’t limit number of data items, etc.)

public class TestEntity : TableEntity {

	public TestEntity(string a, string b) {
		PartitionKey = a;
		RowKey = b;
		DataItems = new Dictionary<string, string>();
		DataItems.Add("foo", "bar");
		DataItems.Add("Jacob", "Xander");
	}

	public Dictionary<string, string> DataItems { get; set; }

	public override IDictionary<string, EntityProperty> WriteEntity(OperationContext operationContext) {
		var results = base.WriteEntity(operationContext);
		foreach (var item in DataItems) {
			results.Add("D_" + item.Key, new EntityProperty(item.Value));
		}
		return results;
	}

	public override void ReadEntity(IDictionary<string, EntityProperty> properties, OperationContext operationContext) {
		DataItems = new Dictionary<string, string>();

		foreach (var item in properties) {
			if (item.Key == "Timestamp") {
				Timestamp = item.Value.DateTimeOffsetValue.Value;
			} else if (item.Key == "RowKey") {
				RowKey = item.Value.StringValue;
			} else if (item.Key == "PartitionKey") {
				PartitionKey = item.Value.StringValue;
			} else if (item.Key.StartsWith("D_")) {
				string realKey = item.Key.Substring(2);
				ItemData[realKey] = item.Value.StringValue;
			}
		}
	}
}

First key thing to remember – Azure table storage can only store a total of 255 key/value pairs – or 252 custom ones once you’ve taken PartitionKey, etc. into account.

I’d welcome any comments, improvements, or just drop me a note if you’ve used this in your own project – thanks!